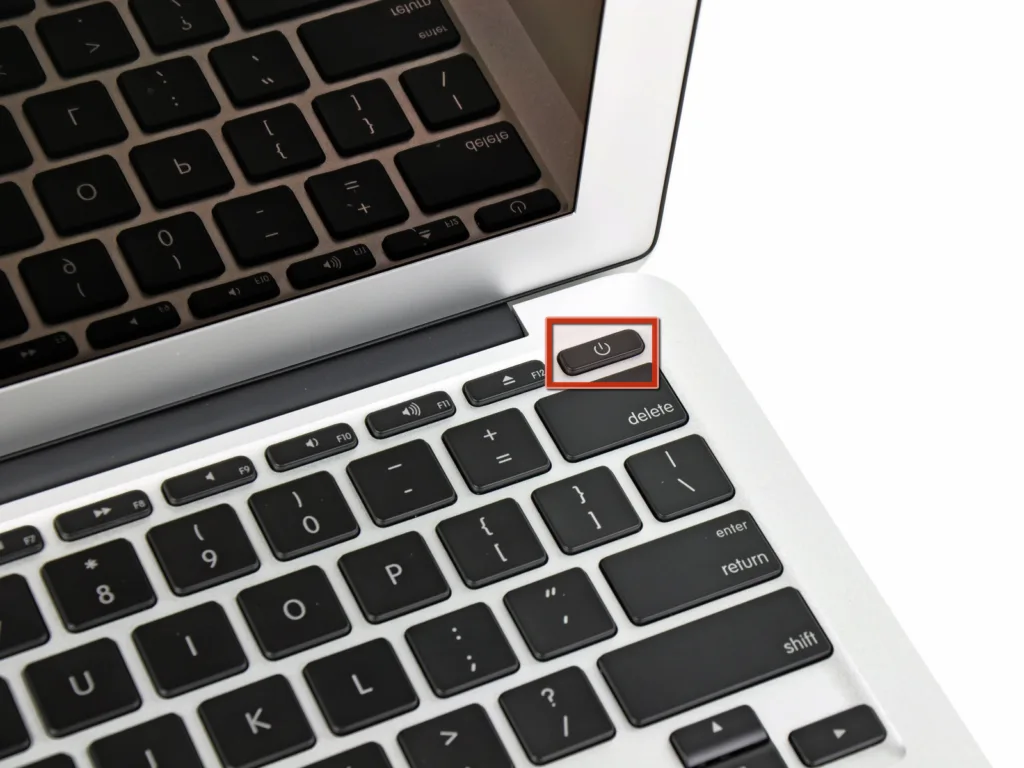
The eject button on a Mac is a small but essential key that can come in handy when you need to remove a CD or DVD from your computer’s optical drive. While the button is not present on all Mac models, it can be found on most modern Apple keyboards, including those for iMacs and MacBooks with built-in optical drives.
To use the eject button, simply locate it in the upper right corner of your keyboard and press and hold it down until the eject symbol appears on your screen. This symbol looks like an upward-pointing triangle above a horizontal bar and indicates that your computer is now ejecting the CD or DVD from the optical drive.
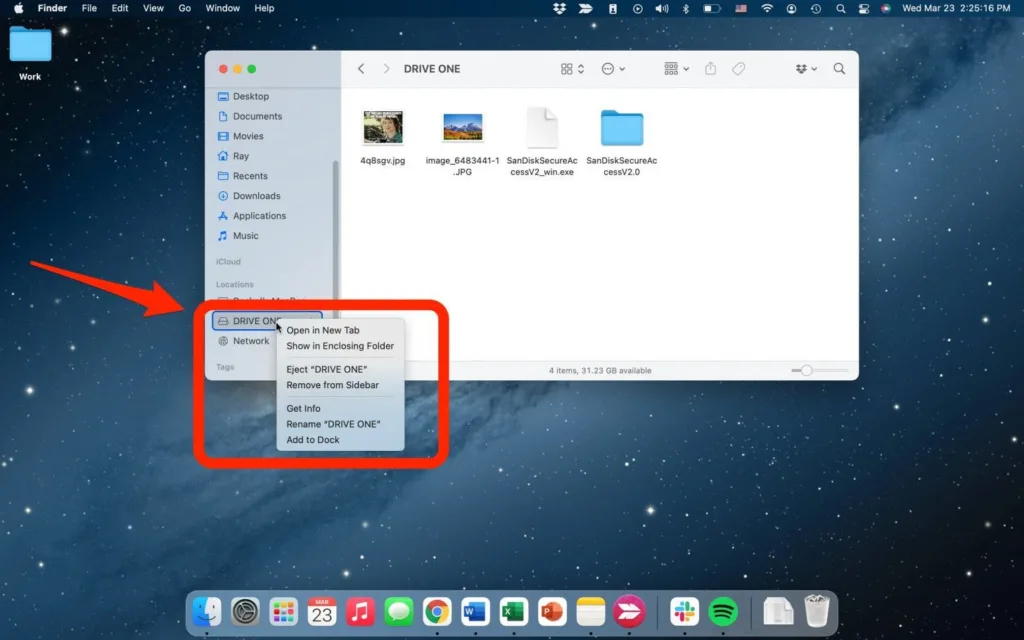
It’s important to note that not all Mac models have an eject button, and in some cases, you may need to use other methods to eject a disc. For example, if you have a MacBook Air or a newer MacBook Pro withut a built-in optical drive, you can use the Finder to eject a disc. Simply open the Finder, select the disc you want to eject from the sidebar, and click the eject button that appears next to its name.
Alternatively, you can also use the keyboard shortcut Command + E to eject a disc in the Finder. This shortcut works on all Mac models and can be a quick and easy way to eject a disc without having to navigate through menus or use the eject button.
The eject button on a Mac is a useful key that can help you quickly and easily remove CDs and DVDs from your computer’s optical drive. While not all Mac models have an eject button, there are other methods you can use to eject discs, such as the Finder and keyboard shortcuts. So the next time you need to eject a disc from your Mac, remember to look for the eject button or use one of these other methods to get the job done quickly and efficiently.
The Location of the Eject Key on a Mac
The eject key on a Mac is located at the top right corner of the keyboard, and is labeled “Media Eject.” It is represented by a triangle with a line beneath it pointing upwards. This key is typically used to eject CDs or DVDs from a Mac’s optical drive. To eject a disc, simply press and hold the Media Eject key until the eject symbol appears on the screen, indicating that it is safe to remove the disc. It is important to note that not all Mac computers have an optical drive, and therefore may not have a dedicated eject key. In such cases, users can typically eject discs via othr methods, such as dragging the disc icon to the trash or using the keyboard shortcut Command + E.

Appearance of an Eject Button
The eject button is typically represented by a symbol that consists of an upward-pointing triangle aove a horizontal line or bar. The triangle represents an arrow or pointer indicating the direction of movement, while the horizontal line or bar represents the surface or object from which something is being ejected. The symbol is commonly used on electronic devices such as CD/DVD players, computer disk drives, and other media devices to indicate the button or function that ejects the disc or media from the device. In general, the eject button is easily recognizable due to its distinctive symbol and is often located on the front or top of the device for easy access.
Location of the Eject Power Button on Mac
The eject power button on a Mac can be found on the upper right corner of the keyboard. This button serves a dual purpose as it conains both the power and eject functions. The button is typically labeled with a power icon or an eject icon, depending on the model of the Mac. It is worth noting that not all Mac models have a physical eject button, as some newer models may use software-based methods to eject discs or other media. However, for most MacBook Air and Pro models, the eject power button can be found in the upper right corner of the keyboard.
The Location of the Eject Key
The Eject key is typically located in the upper right corner of modern Apple keyboards. It is usually labeled with an arrow pointing upward and a horizontal line underneath it. This key is used to eject CDs, DVDs, and other removable media from the computer’s disk drive. It can also be used to eject external storage devices such as USB drives or memory cards. If you are having trouble finding the Eject key on your keyboard, look for the key with the upward arrow symbol and the label “Eject” or “⏏︎” printed on it.
Ejecting Without an Eject Button
If you’re unable to locate the eject button on your device or it’s not functioning properly, you can stll eject the device through your computer’s operating system. On a Windows PC, you can safely eject a USB or external hard drive by clicking on the “Safely Remove Hardware” icon in the system tray. If you can’t find the icon, you can access it by pressing and holding (or right-clicking) the taskbar, selecting “Taskbar settings,” and then enabling the “Windows Explorer” option. Once you see the “Safely Remove Hardware” option, click on it and select the device you want to eject. Wait for the system to notify you that it’s safe to unplug the device before physically removing it. On a Mac, you can eject a device by dragging its icon to the trash can on your desktop or using the “Eject” button in Finder. Alternatively, you can also right-click on the device and select “Eject.” Remember to wait for the system to finish ejecting the device before physically unplugging it to avoid data loss or corruption.

Symbol for Eject
The symbol for eject is represented by a triangular shape with a horizontal line at the base and an upward-pointing arrow inside the triangle. This symbol is commonly seen on electronic devices such as CD or DVD players, computers, and other devices that have removable media. It indicates the button or action that ejects the media from the device. The symbol is formally knwn as the Eject Symbol and is Unicode character U+23CF. It is categorized as an Other Symbol (So) and belongs to the Basic Multilingual Plane, which encompasses the first 65,536 code points of the Unicode standard. The Eject Symbol is a widely recognized icon that has become a universal standard for the action of ejecting media from a device.
Is Ejecting the Same as Safely Removing?
Eject and safely remove are not the same. Eject refers to the process of physically removing the media (such as a CD or USB drive) from the device. It simply opens the tray or releases the device, indicating that the media can be safely removed. However, the device itself is still connected and powered on.
On the other hand, safely remove involves a more thorough process. It flushes any pending writes from the cache to the device, ensuring that all data is written properly and nthing is lost. Then, it removes the entire device from the system, ensuring that there are no active connections or processes. This is important because removing a device without properly ejecting or safely removing it can result in data loss or corruption.
While both eject and safely remove allow you to remove a device from your system, safely remove is the safer and more thorough option as it ensures that all data is properly written and the device is fully disconnected.
Troubleshooting Mac USB Ejection Issues
There could be several reasons why you are unable to eject your USB from your Mac. One possible reason is that some files or applications on the USB are still in use. If any files are open from the USB, your Mac will not allow you to eject it until those files are closed. Another reason could be that the USB is corrupted or damaged, which can prevent it from being ejected properly. Additionally, sometimes there can be issues with the hardware or software of your Mac that can cause problems with ejecting USBs. In such cases, restarting your Mac may resolve the issue. In some rare cases, you may need to force eject the USB, but this sould be done with caution as it can potentially damage the files on the USB. If you are still having trouble ejecting your USB from your Mac, it may be helpful to seek assistance from a technical expert.
Ejecting a USB from a Mac Without an Icon
If you’re not seeing the USB icon on your Mac, it can be frustrating to try and eject it. Fortunately, there is a way to eject a USB drive from your Mac without using the icon. Here are the steps you can follow:
1. Open the Terminal application on your Mac. You can find it in the Utilities folder, which is located in the Applications folder.
2. Once you have Terminal open, type in the following command: diskutil list. This will display a list of all the drives connected to your Mac.
3. Find the name of your USB drive in the list. It should be soething like /dev/disk2s1 or /dev/disk3s2.
4. Once you have found the name of your USB drive, type in the following command: diskutil eject /dev/diskX. Replace “X” with the number that corresponds to your USB drive. For example, if your USB drive is listed as /dev/disk2s1, you would type in “diskutil eject /dev/disk2”.
5. Press Enter to run the command. This will eject your USB drive from your Mac.
Once you have ejected your USB drive, you can safely unplug it from your Mac. It’s important to always eject your USB drive before unplugging it, as failing to do so can result in data loss or other issues. By using the Terminal to eject your USB drive, you can ensure that it is safely removed from your Mac without relying on the USB icon.

Conclusion
The eject button on Mac computers is a useful key that allows users to easily eject discs from teir DVD drives. This button is located at the top of the keyboard on Macs with a DVD drive, and it can be easily accessed by pressing and holding it until the eject symbol appears onscreen. For other MacBook models without a DVD drive, the power button serves as a multi-functional key that includes the power and eject functions. The eject button is a simple yet essential feature that makes it easy for Mac users to manage their media and keep their devices organized.
